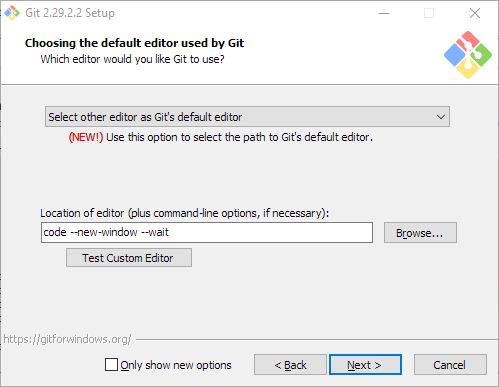
git config --global core.editor "code --new-window --wait"
Installing git on Windows
The default editor can be configured in the installation wizard in Windows. Uncheck ‘Only show new options’ to ensure that this step is shown.
syncyarnlock, but I couldn’t find any equivalent tool for npm. So I wrote one.
syncpackagejson synchronizes the installed versions of Node.js dependencies as specified in package-lock.json into package.json.
The package is intended to be used together with npm upgrade, like this.
npm upgrade && npx syncpackagejson && npm install
This is still very much a 1.0 release. When you find a bug or something missing, please file an issue.
]]>GatsbyContentfulFluid_tracedSVG or GatsbyContentfulFluid_withWebp, but you have to choose between one or the other. Fortunately is not that difficult to add a fragment query this allows having both.
Create a file with shared query fragments, e.g. fragments.ts. Just make sure that Contentful can see the file. Mat Clutter has more information about Using GraphQL fragments across multiple templates in GatsbyJS.
import { graphql } from "gatsby"

// The name of this constant isn't important.
export const tracedSvgAndWithWebp = graphql`
  fragment GatsbyContentfulFluid_tracedSvg_withWebp on ContentfulFluid {
    tracedSVG
    aspectRatio
    src
    srcSet
    srcWebp
    srcSetWebp
    sizes
  }
`
Replace your exiting fragments with new GatsbyContentfulFluid_tracedSvg_withWebp, e.g.
export const imageQuery = graphql`
  image {
    fluid(maxWidth: 1680, maxHeight: 1050) {
      ...GatsbyContentfulFluid_tracedSvg_withWebp
    }
    description
  }
`
The fragments that gatsby-contentful-source comes with are all defined in their fragments.js file. GatsbyContentfulFluid_tracedSvg_withWebp is a combination of GatsbyContentfulFluid_tracedSVG and GatsbyContentfulFluid_withWebp.
I create a commit after each step, so that I can easily undo or debug, if necessary, and I generally test running the app after each stop to make sure it still work. Upgraded packages sometimes require minor changes to the code.
The Expo CLI will do the most of the work upgrading the app, so start out by making sure I have the latest version of that command line tool.
yarn add --dev expo-cli@latest
Expo CLI can upgrade Expo and all packages that it knows about, respecting Expo’s specific version requirements. expo upgrade updates the version numbers in package.json and installs them afterwards to keep the yarn.lock in sync.
yarn expo upgrade
Make a note of the packages there weren’t upgraded by Expo. Here’s an example of the list of unknown packages.
The following packages were not updated. You should check the READMEs for those repositories to determine what version is compatible with your new set of packages: @react-navigation/native, @react-navigation/stack, prop-types, tslib, @babel/core, @types/expo__vector-icons, @typescript-eslint/eslint-plugin, @typescript-eslint/parser, eslint, eslint-config-prettier, eslint-plugin-prettier, eslint-plugin-react, expo-cli, prettier, sharp-cli
Upgrade the unknown packages and any transitive dependencies that weren’t touched by expo upgrade.
yarn upgrade
yarn upgrade doesn’t upgrade packages to new major versions. Verify if there is anything not up to date, and if so, consider upgrading. For my Expo projects this is typically the ESLint related packages. I update the version manually in package.json and then run yarn install.
Some of the know packages might show up as deprecated, but do not updated those. Expo has been tested with specific versions of these packages, and they are naturally a little behind the latest releases.
# Look for major updates to unknown packages. These are the red lines, where the package was listed as unknown in step 1.
yarn outdated
package.jsonI like being able to see the exact version of the packages that I have installed by looking in package.json, so I use syncyarnlock to synchronize the versions from yarn.lock to package.json. Run a yarn install after modifying package.json to sync the modifications back to yarn.lock.
npx syncyarnlock --keepPrefix --save && yarn install
git config --global core.editor "code --new-window --wait"
The default editor can be configured in the installation wizard in Windows. Uncheck ‘Only show new options’ to ensure that this step is shown.
The source code related to the series is available on GitHub. If you prefer reading code, you can browse the commit history instead.
Creating the Azure Function in TypeScript has been split into seven parts. If you already know about Azure Functions in JavaScript you might want to skip ahead to part 2. The tests are very simple, so part 3, 4 and 5 are mostly about configuring CircleCI and creating an ARM template. The 6th part, refactoring,was the most exciting one to write.
Part 1: JavaScript version. Install the prerequisites and create a serverless function in JavaScript triggered by HTTP.
Part 2: Switch to TypeScript. Convert the JavaScript function to TypeScript.
Part 3: Add a Test. Add a local test and create a continuous integration pipeline that runs the test.
Part 4: Continuous Deployment. Extend the continuous integration pipeline into a continuous deployment pipeline, finally deploying the code to Azure.
Part 5: Add an End-to-end Test. Use the public endpoint on Azure to create an end-to-end test.
Part 6: Refactor. Now that we have test coverage we can refactor the code with ease of mind.
Part 7: Node Module. Demonstrate how to use a Node Module.
Azure Functions require a long term support (LTS) version of Node.js. The latest version, version 12, is an LTS version, but it’s still quite new, so for now to be safe I recommend sticking version 10, since that’s the one that Microsoft mentions in the previous link. When installing older versions with Homebrew we have to forcibly tell it to set that version to the default one. Remember to re-link if you upgrade Node.js. You can use nvm if you need to switch between different versions of Node.js.
$ brew install node@10
$ brew link node@10 --force --overwrite
Install Yarn. Yarn is a better npm. I am particularly fund of the really fast installs on a project where the dependencies are up to date, because this allows you include yarn install as part of the build, making sure that you are always using the correct versions.
$ brew install yarn
Install the command line tools for Azure Functions, Azure Functions Core Tools. This is the func shell command. The tools are installed as a local Node.js package instead of a global tool because we will be using the func command later on in our continuous integration pipeline. Installing it locally also has the benefit that if you’re a team of developers, it easy to keep everybody on the same version.
I always install exact versions of the Node.js packages that I use (--exact) because I like being able to see the versions of the installed packages in package.json. With the command line tool npm-check-updates installed you can upgrade all the packages with the command ncu -u && yarn upgrade. I recommend keeping upgrades in their own commits to make it easy to revert an upgrade, should it break something.
$ mkdir azure-functions-typescript
$ cd azure-functions-typescript
$ yarn add --exact --dev azure-functions-core-tools
Initialize the project and create an HTTP triggered function called greet.
$ yarn run func init --worker-runtime node
$ yarn run func new --name greet --language JavaScript
# Press 8 to create an HTTP triggered function.
This results in the following folder structure. A few notes
host.json.function.json file.local.settings.json are only used when hosting the functions locally. They are not copied to Azure when publishing.├── greet
│ ├── function.json
│ ├── index.js
│ └── sample.dat
├── node_modules
│ └── ...
├── host.json
├── local.settings.json
├── package.json
└── yarn.lock
The local Azure Functions host is started with the command yarn func host start. The yarn prefix is necessary since the func command is installed locally. This is bit long to type, so we add a start script command to package.json. We can now start the local host with this command:
$ yarn start
Open a browser window, go to http://localhost:4000/api/greet, add a name as a query parameter, and you will see it echoed back.

The full code base after part 1 has a few more files added to it. They consist of the three things below. If you want more details, then take a look at the commit history.
The Azure Functions extension for VSCode requires that the Azure Functions Core Tools are available as a global command. I recommend installing the tools with Homebrew, since that makes it easy to maintain the package together with Node.js and Yarn (brew install azure-functions-core-tools). It’s fine having the tools installed both locally and globally.
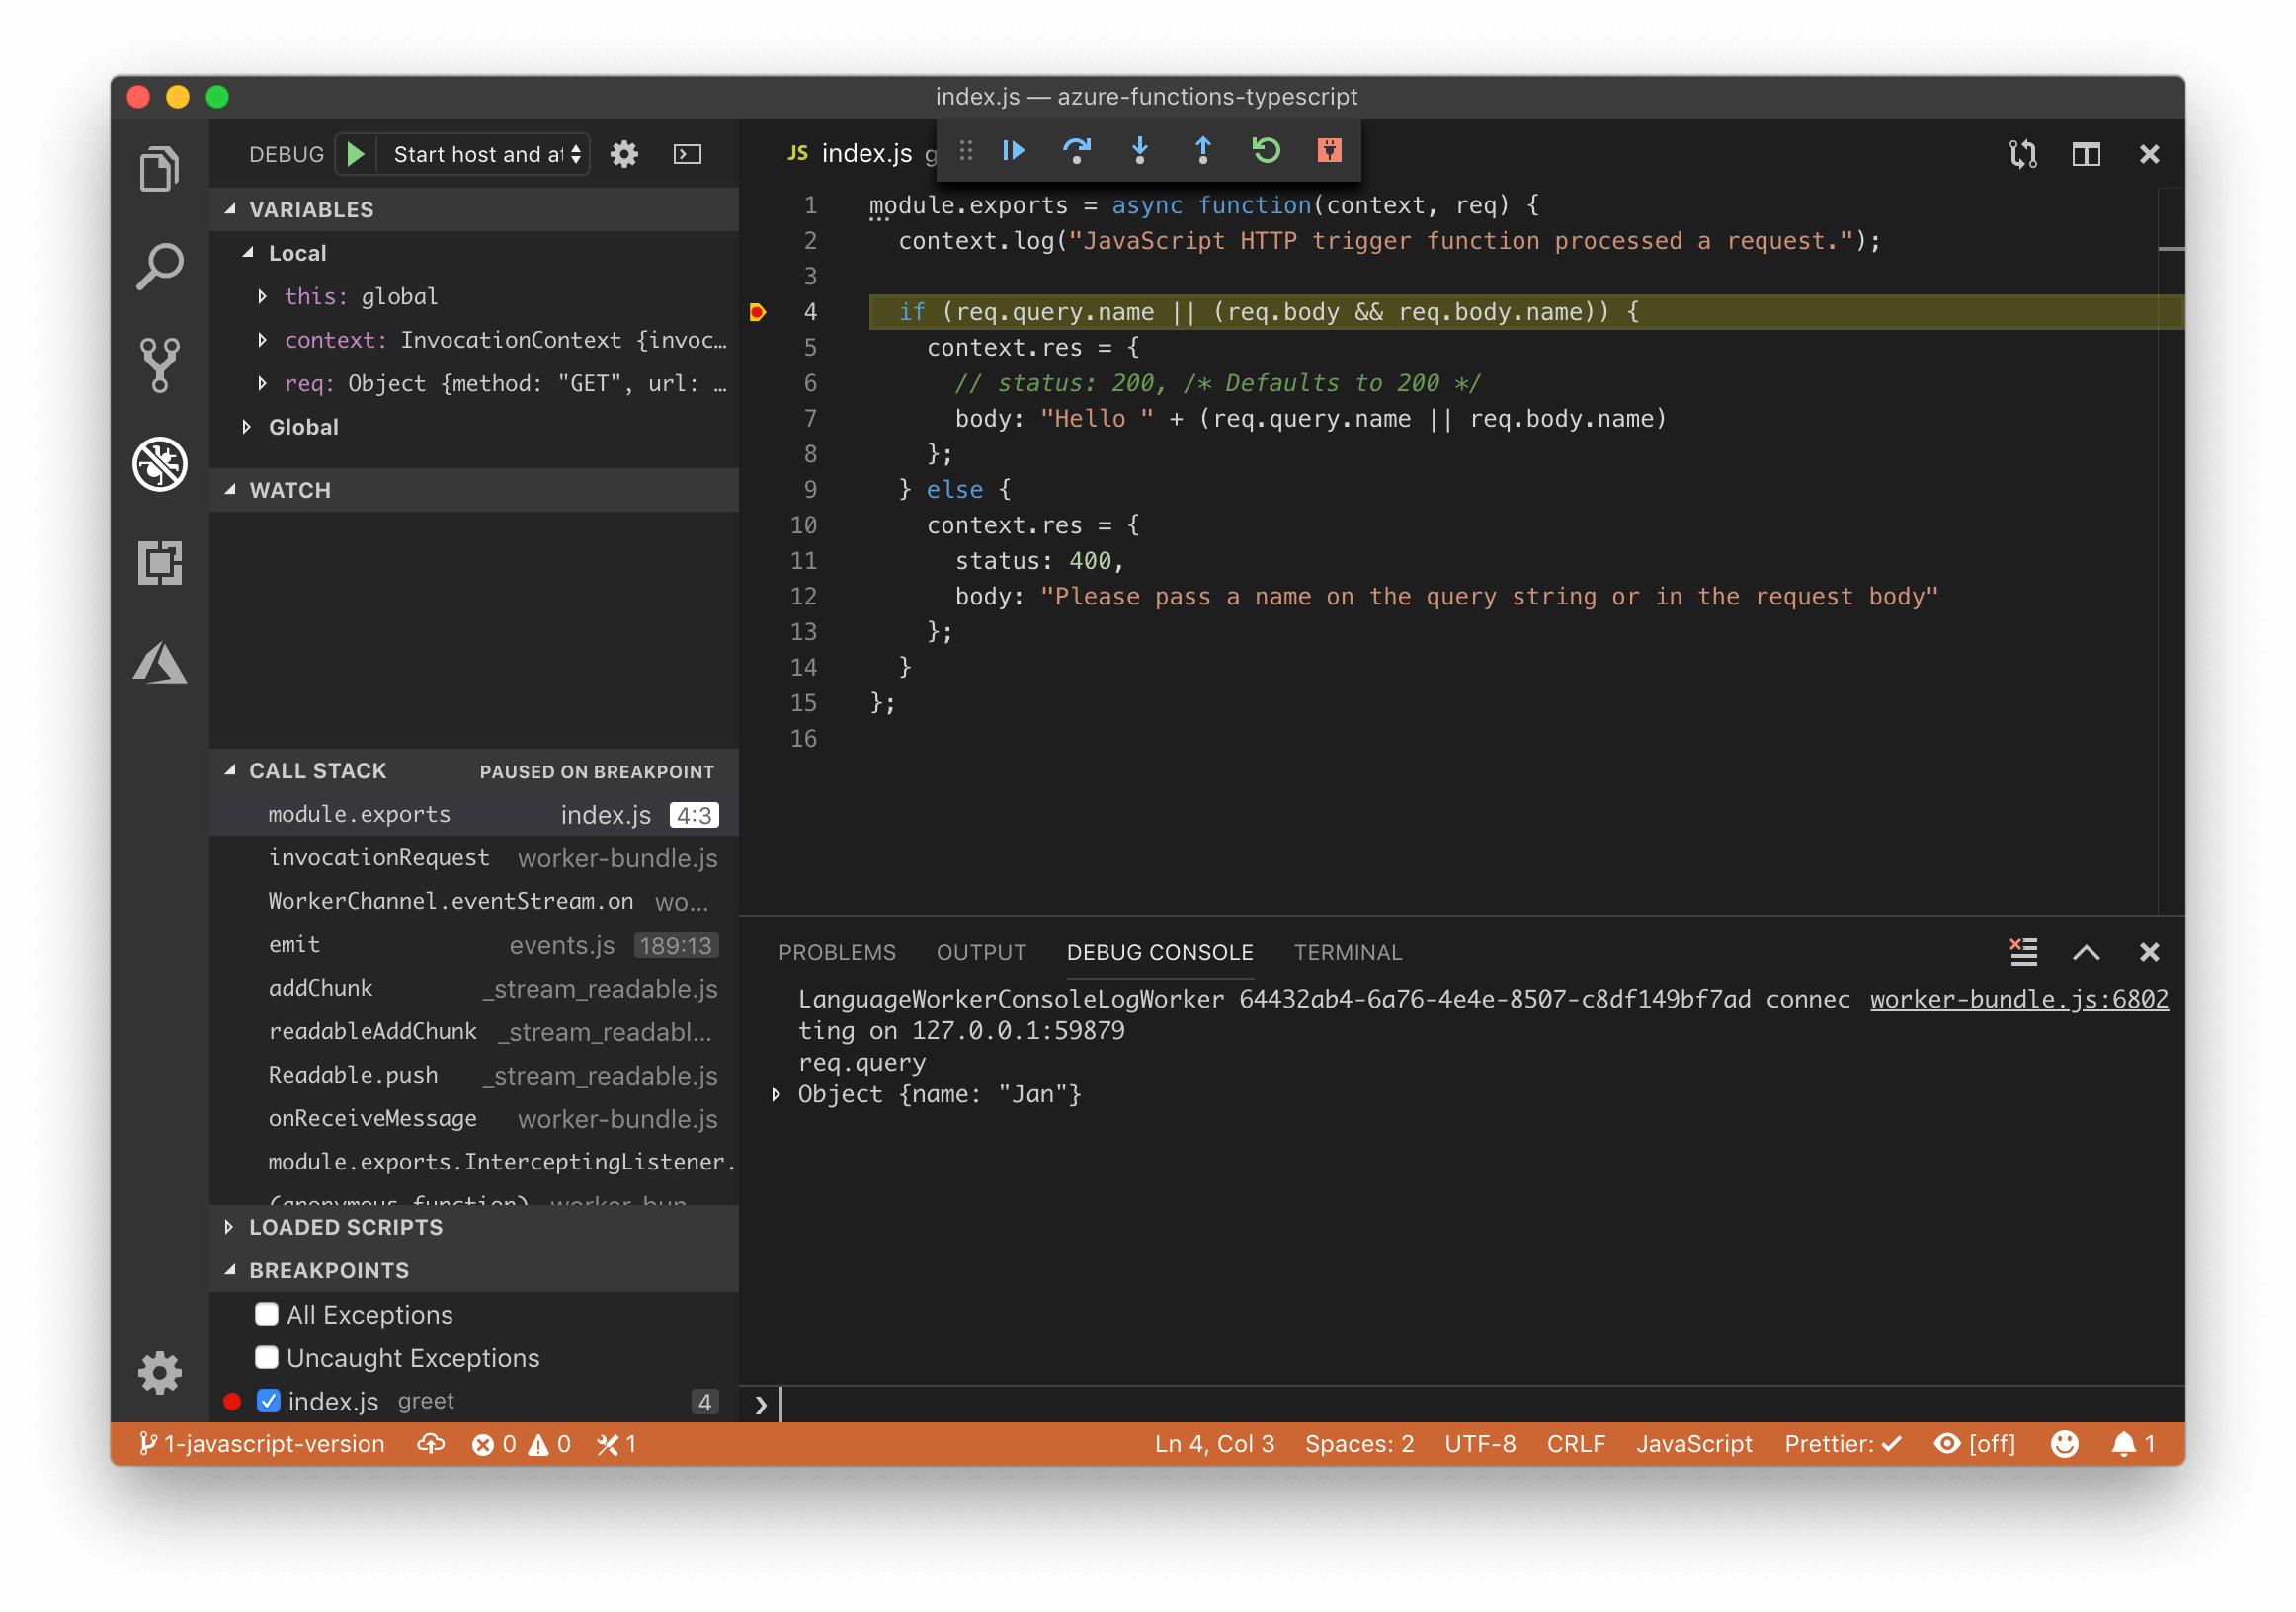
It’s possible to debug and hit breakpoints in Visual Studio Code. Set a breakpoint and start the local host with VSCode’s debugger panel. This will run yarn start and attach a debugger to Node.js. Remember to trigger the function by calling the http://localhost:4000/api/greet URL.
If you prefer reading code, this is the code base after part 2.
To keep things organized we put the source files in a folder named src and we will be building into a distribution folder named dist.
├── node_modules
│   └── ...
├── src
│   ├── greet
│   │   ├── function.json
│   │   ├── index.ts (renamed from .js)
│   │   └── sample.dat
│   ├── host.json
│   └── local.settings.json
├── package.json
└── yarn.lock
We’re now ready to compile. This will require installing the TypeScript compiler.
$ yarn add --exact --dev typescript
The TypeScript compiler is configured with a tsconfig.json file.
module and moduleResolution is configured to compile into JavaScript output that is compatible with the Azure Functions host.outDir and rootDir are the output and input folders.sourceMap means that we want TypeScript to generate map files along with the js files. This allows us to debug the TypeScript source files, instead of debugging the generated JavaScript files.target instructs the compiler to output JavaScript that is compatible with the very recent ECMAScript version 2018. This is possible since Node.js version 10 supports ECMAScript 2018.// tsconfig.json
{
"compilerOptions": {
"module": "commonjs",
"moduleResolution": "node",
"outDir": "dist",
"rootDir": "src",
"sourceMap": true,
"target": "es2018"
}
}
Note that you strive to always turn on TypeScript strict mode that enables a handful of very nice compile time checks. We will do this when refactoring the code in part 6.
Building the solution consists of two things:
src to dist.We create a build command to handle this, and we update our start command so that the solution is built before starting the host. The start is also updated to switch to the dist folder.
// In package.json
"scripts": {
  "build": "tsc && cp src/*.json dist && cp src/greet/*.json dist/greet",
  "start": "yarn run build && (cd dist; func host start)"
}
We still use yarn run start to start our local Azure host, but now the code is compiled first.
The command for copying the json files cp src/*.json dist && cp src/greet/*.json dist/greet would have to be updated every time we add or rename a function. This is avoided by using the small copyfiles command line tool.
// In package.json
"build": "tsc && copyfiles --up 1 \"src/**/*.json\" dist",
Right now the build command is very simple, but as the project grows it might become beneficial to introduce a build tool like Webpack. We explore using Webpack in part 7.
The code after this third part.
Since we’re coding in TypeScript we also have to install ts-jest and @types/jest when installing jest.
$ yarn add --exact --dev jest ts-jest @types/jest
(Side note: Installing Jest blows up the number of Node packages from 108 to 448. These guys really like using packages.)
Our test is pretty straight forward: It creates fake request and context objects and calls the run function to verify that the response is indeed Hello Jan Aagaard as expected.
// greet/index.test.ts
import { run as greet } from "./index";

describe("greet function", () => {
  test("returns correct greeting", async () => {
    const request = {
      query: {
        name: "Jan Aagaard"
      }
    };

    const context = {
      log: () => undefined,
      req: request
    };

    await greet(context, request);
    const response = (context as any).res;

    expect(response.body).toBe("Hello Jan Aagaard");
  });
});
The code base includes a script command to run the tests, so that they can be executed by typing yarn test. Instead of relying on an external command to run the tests, I recommend installing the excellent Jest extension for Visual Studio Code. I will run the tests continuously in the background, and show the results in VSCode’s status bar.
The default setting is to show a ‘Debug’ link above the tests that are failing, but I like being able to step into my code at any time. Adding the following line to .vscode/settings.json makes the ‘Debug’ link show permanently.
// In .vscode/settings.json
"jest.debugCodeLens.showWhenTestStateIn": ["fail", "pass", "skip", "unknown"],
Instead of relying on that the developers remember to run the tests locally, we will set up a continuous integration pipeline that executes the tests and blocks the pull request, should any of them fail. CircleCI is one of the options for automating builds when having code hosted on GitHub, and it seems like it’s currently gaining a lot of traction. Create your CircleCI account by signing in via GitHub, and then create a config.yml file that configures pipeline. These are the steps in the pipeline:
It isn’t necessary to build the code before running the tests because ts-jest takes care of that when running them. But it’s nice to include the build step anyways to catch any compile errors, and likewise we also include a lint step.
# .circleci/config.yml
version: 2.1
jobs:
  build:
    docker:
      # Match the version in azure-resource.json. See https://docs.microsoft.com/en-us/azure/azure-functions/functions-reference-node#node-version.
      - image: circleci/node:10.14.1-stretch

    steps:
      - checkout

      - run:
          name: Install Node modules
          command: yarn install --frozen-lockfile

      - run:
          name: Build
          command: yarn run build

      - run:
          name: Lint
          command: yarn run lint

      - run:
          name: Run tests
          command: yarn run test
The final config.yml has a few more steps, adding a cache of the node_modules folder to speed up the build time and presenting the test results in CircleCI.
node_modules.node_modules.CircleCI requires that test results are stored as JUnit XML files, and Jest uses json by default. The command for saving the test results ended up being quite long.
// In package.json
"test-save-results": "cross-env JEST_JUNIT_OUTPUT=test-results/test-results.xml jest --ci --runInBand --reporters=default --reporters=jest-junit"
The code after this fourth part.
We could log in to the Azure Portal, create the necessary resources, and upload the code manually, but instead we will deploy by scripting the process so that we get infrastructure as code where everything is checked into our source tree.
Azure’s Asset Resource Management templates are tricky at first, but once you have used a development setup with automated deployment, I guarantee that you will not want to go back to manual deployments. If you want to know more about all the benefits, the great Martin Fowler has a series about continuous integration where he explains all the benefits.
You need an account on Azure. You can create one for free on portal.azure.com. If you’re new to Azure I recommend that you try some of the manual tutorial out there to get a feel for how the portal works.
Each branch in our source code has an associated unique environment on Azure. New environments are automatically spawned when new branches are created. With such a setup there is are no specific development, test or staging environments. Instead, each branch environment takes each of these role corresponding to the state of the task. So while you’re developing the task it’s a dev environment, when the tests run it’s a test environment, and when the task is tested manually it’s a staging environment.
The production environment is simply the one associated with the master branch. Well, almost. In real world applications, the production environment probably has more resources and nicer URLs than the branch environments, and that leads to also having a test environment that mimics the production setup. But in this tutorial we have the luxury of keeping all environments identical, thus simplifying the infrastructure code and fully respecting dev/prod parity.
Example:
master.azure-functions-typescript-master.https://aft-master-functions.azurewebsites.net/api/greet/.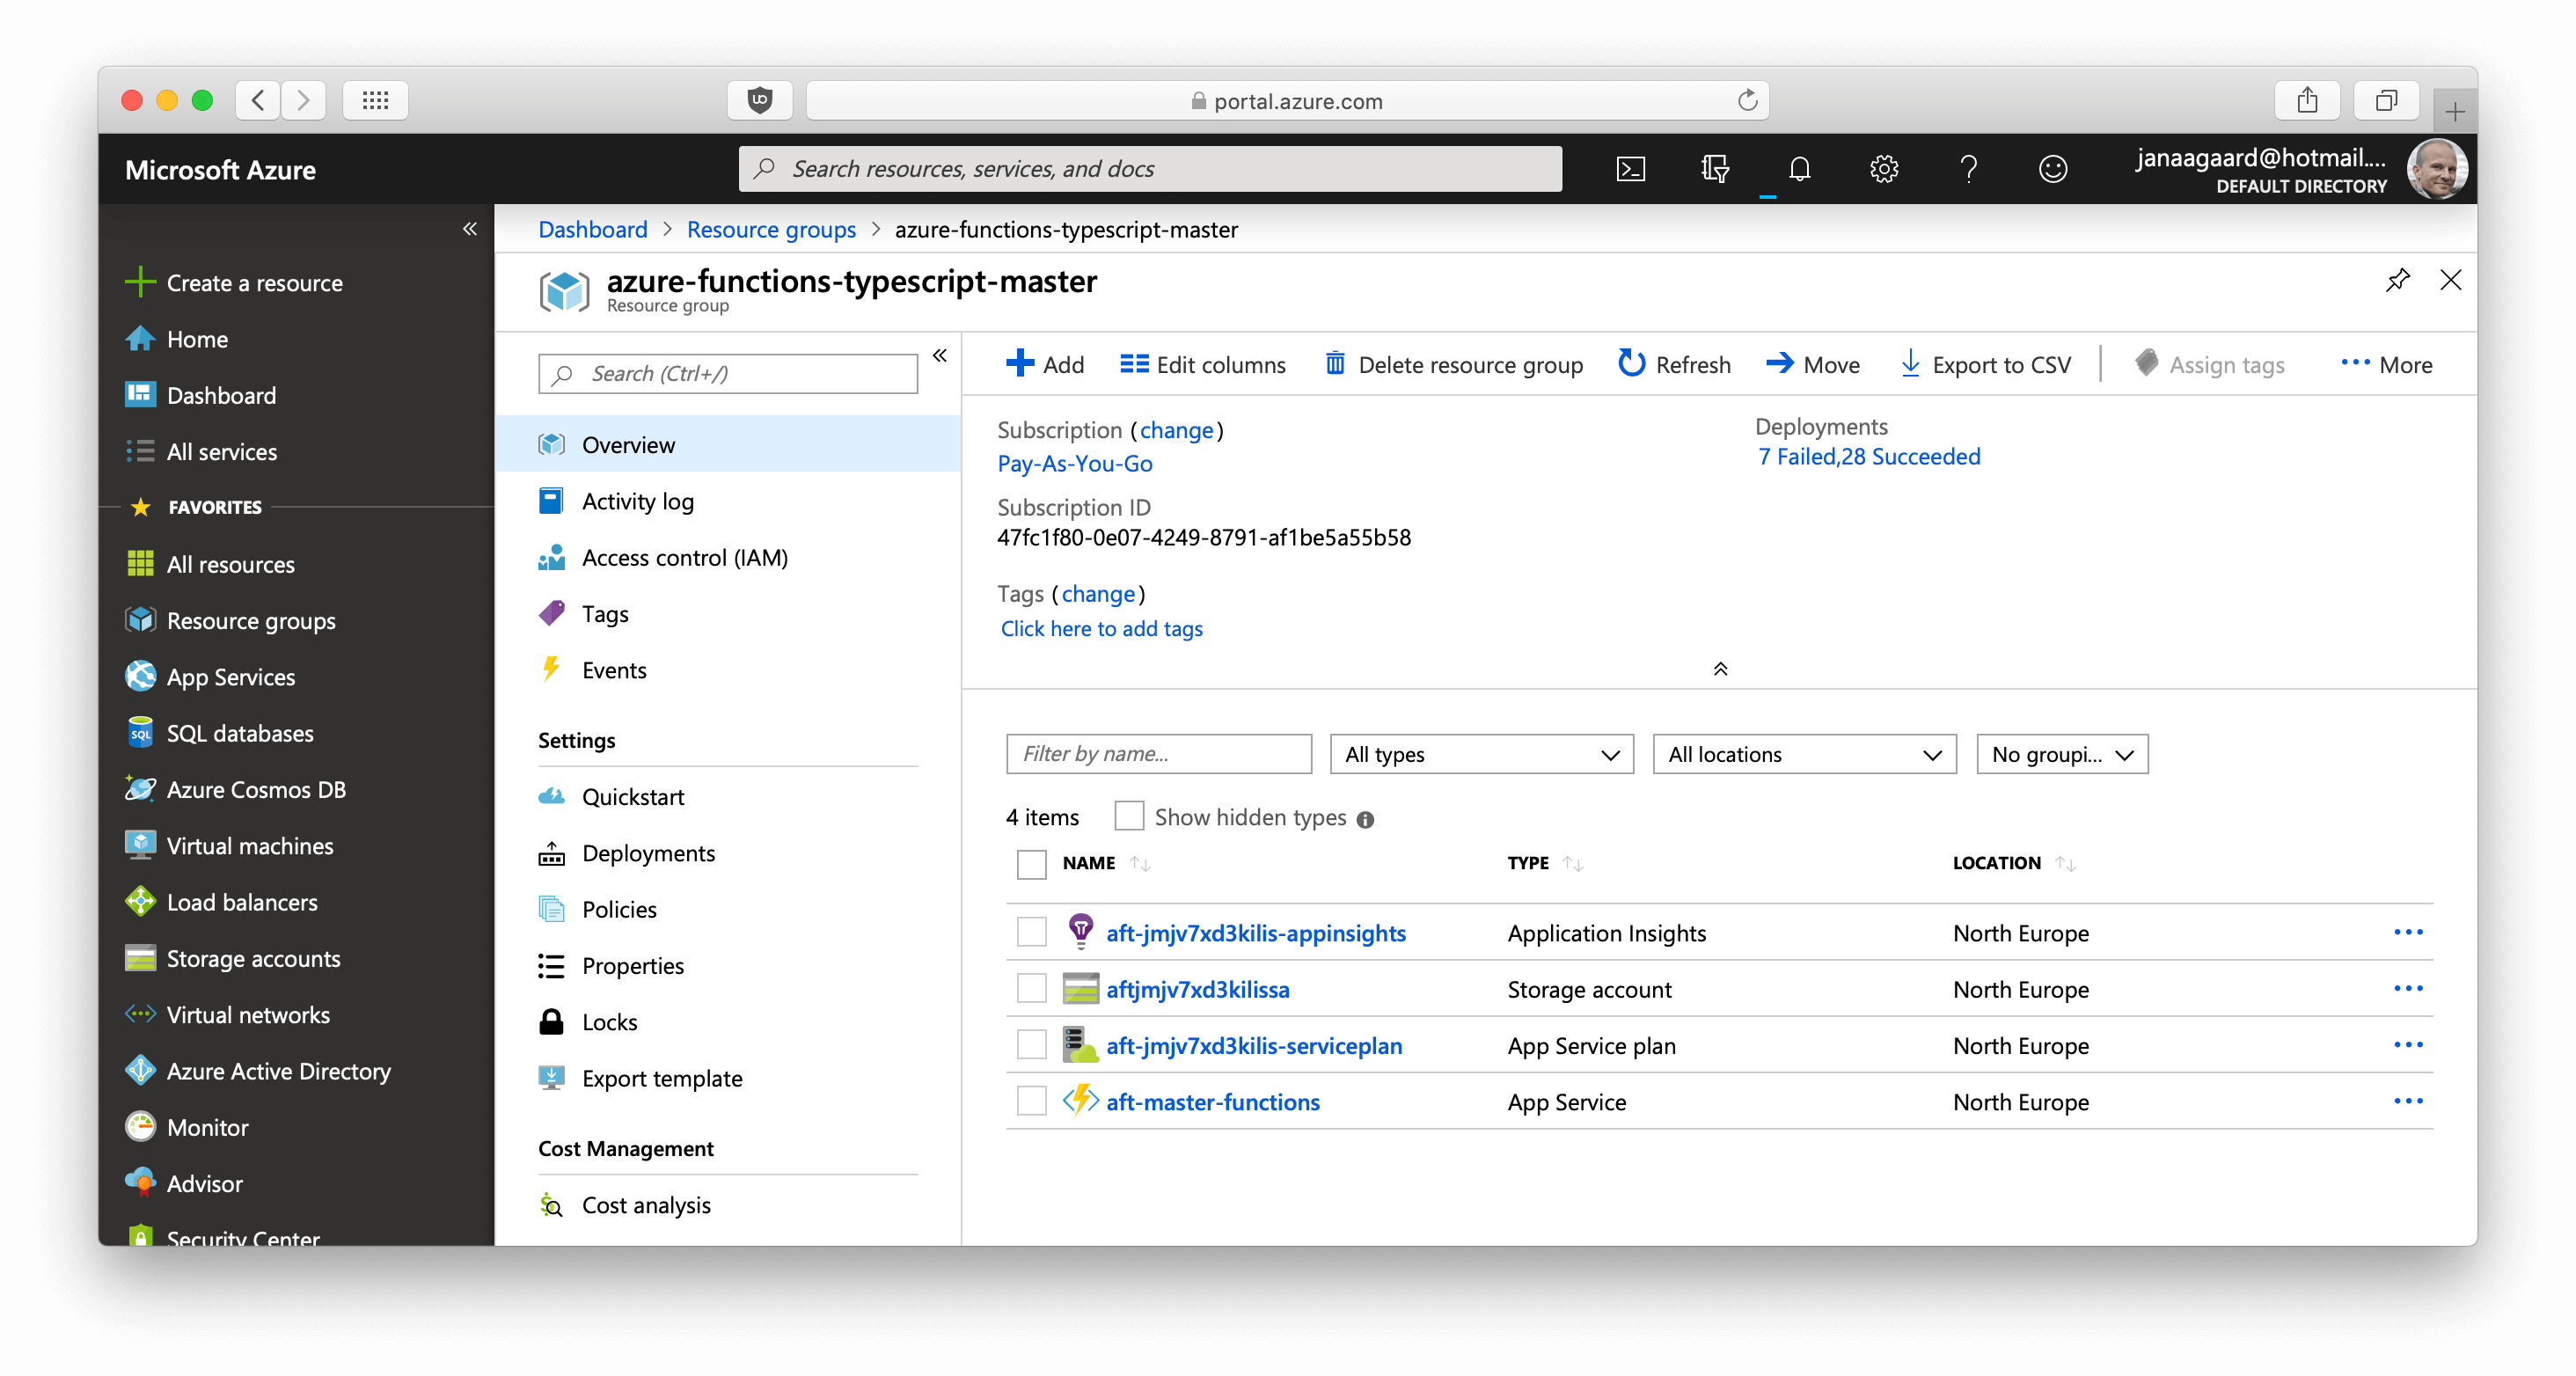
Create or update Azure resources in config.yml calls create-azure-resources.sh with the branch name as a parameter.create-azure-resources.sh uses the Azure Command-Line Interface (the az command) to create a resource group and then the resources inside the group. The resources are described in azure-resources.json.Publish code to Azure in config.yml calls publish-to-azure.sh with the branch name as a parameter.publish-to-azure.sh uses the Azure CLI to copy the compiled JavaScript to Azure.As you can tell just from the length of the official Naming conventions for Azure resources, naming resources in Azure is surprising difficult.
Here are the main restrictions:
We can use uniqueString() to generates a unique string, making sure that we don’t have a name clash with someone else, and at 13 characters it’s short enough to fit into the storage account name.
"[concat('aft', uniqueString(resourceGroup().id), 'sa')]"
becomes aftjmjv7xd3kilis-appsa.
The function apps resource uses the branch name as part of the resource:
[concat('aft-', skip(resourceGroup().name, length('azure-functions-typescript-')), '-functions')]
becomes aft-master-functions.
Using the branch name as part of the function app name puts some restrictions on the branch names:
*) Max_function_app_length - (length(atf-) + length(-function))
= 60 - (4 + 9)
= 47.
A test should verify 1) that a branch name adhere to these rules, and 2) that it doesn’t clash with the name of another branch before the resources are published. This has not been done.
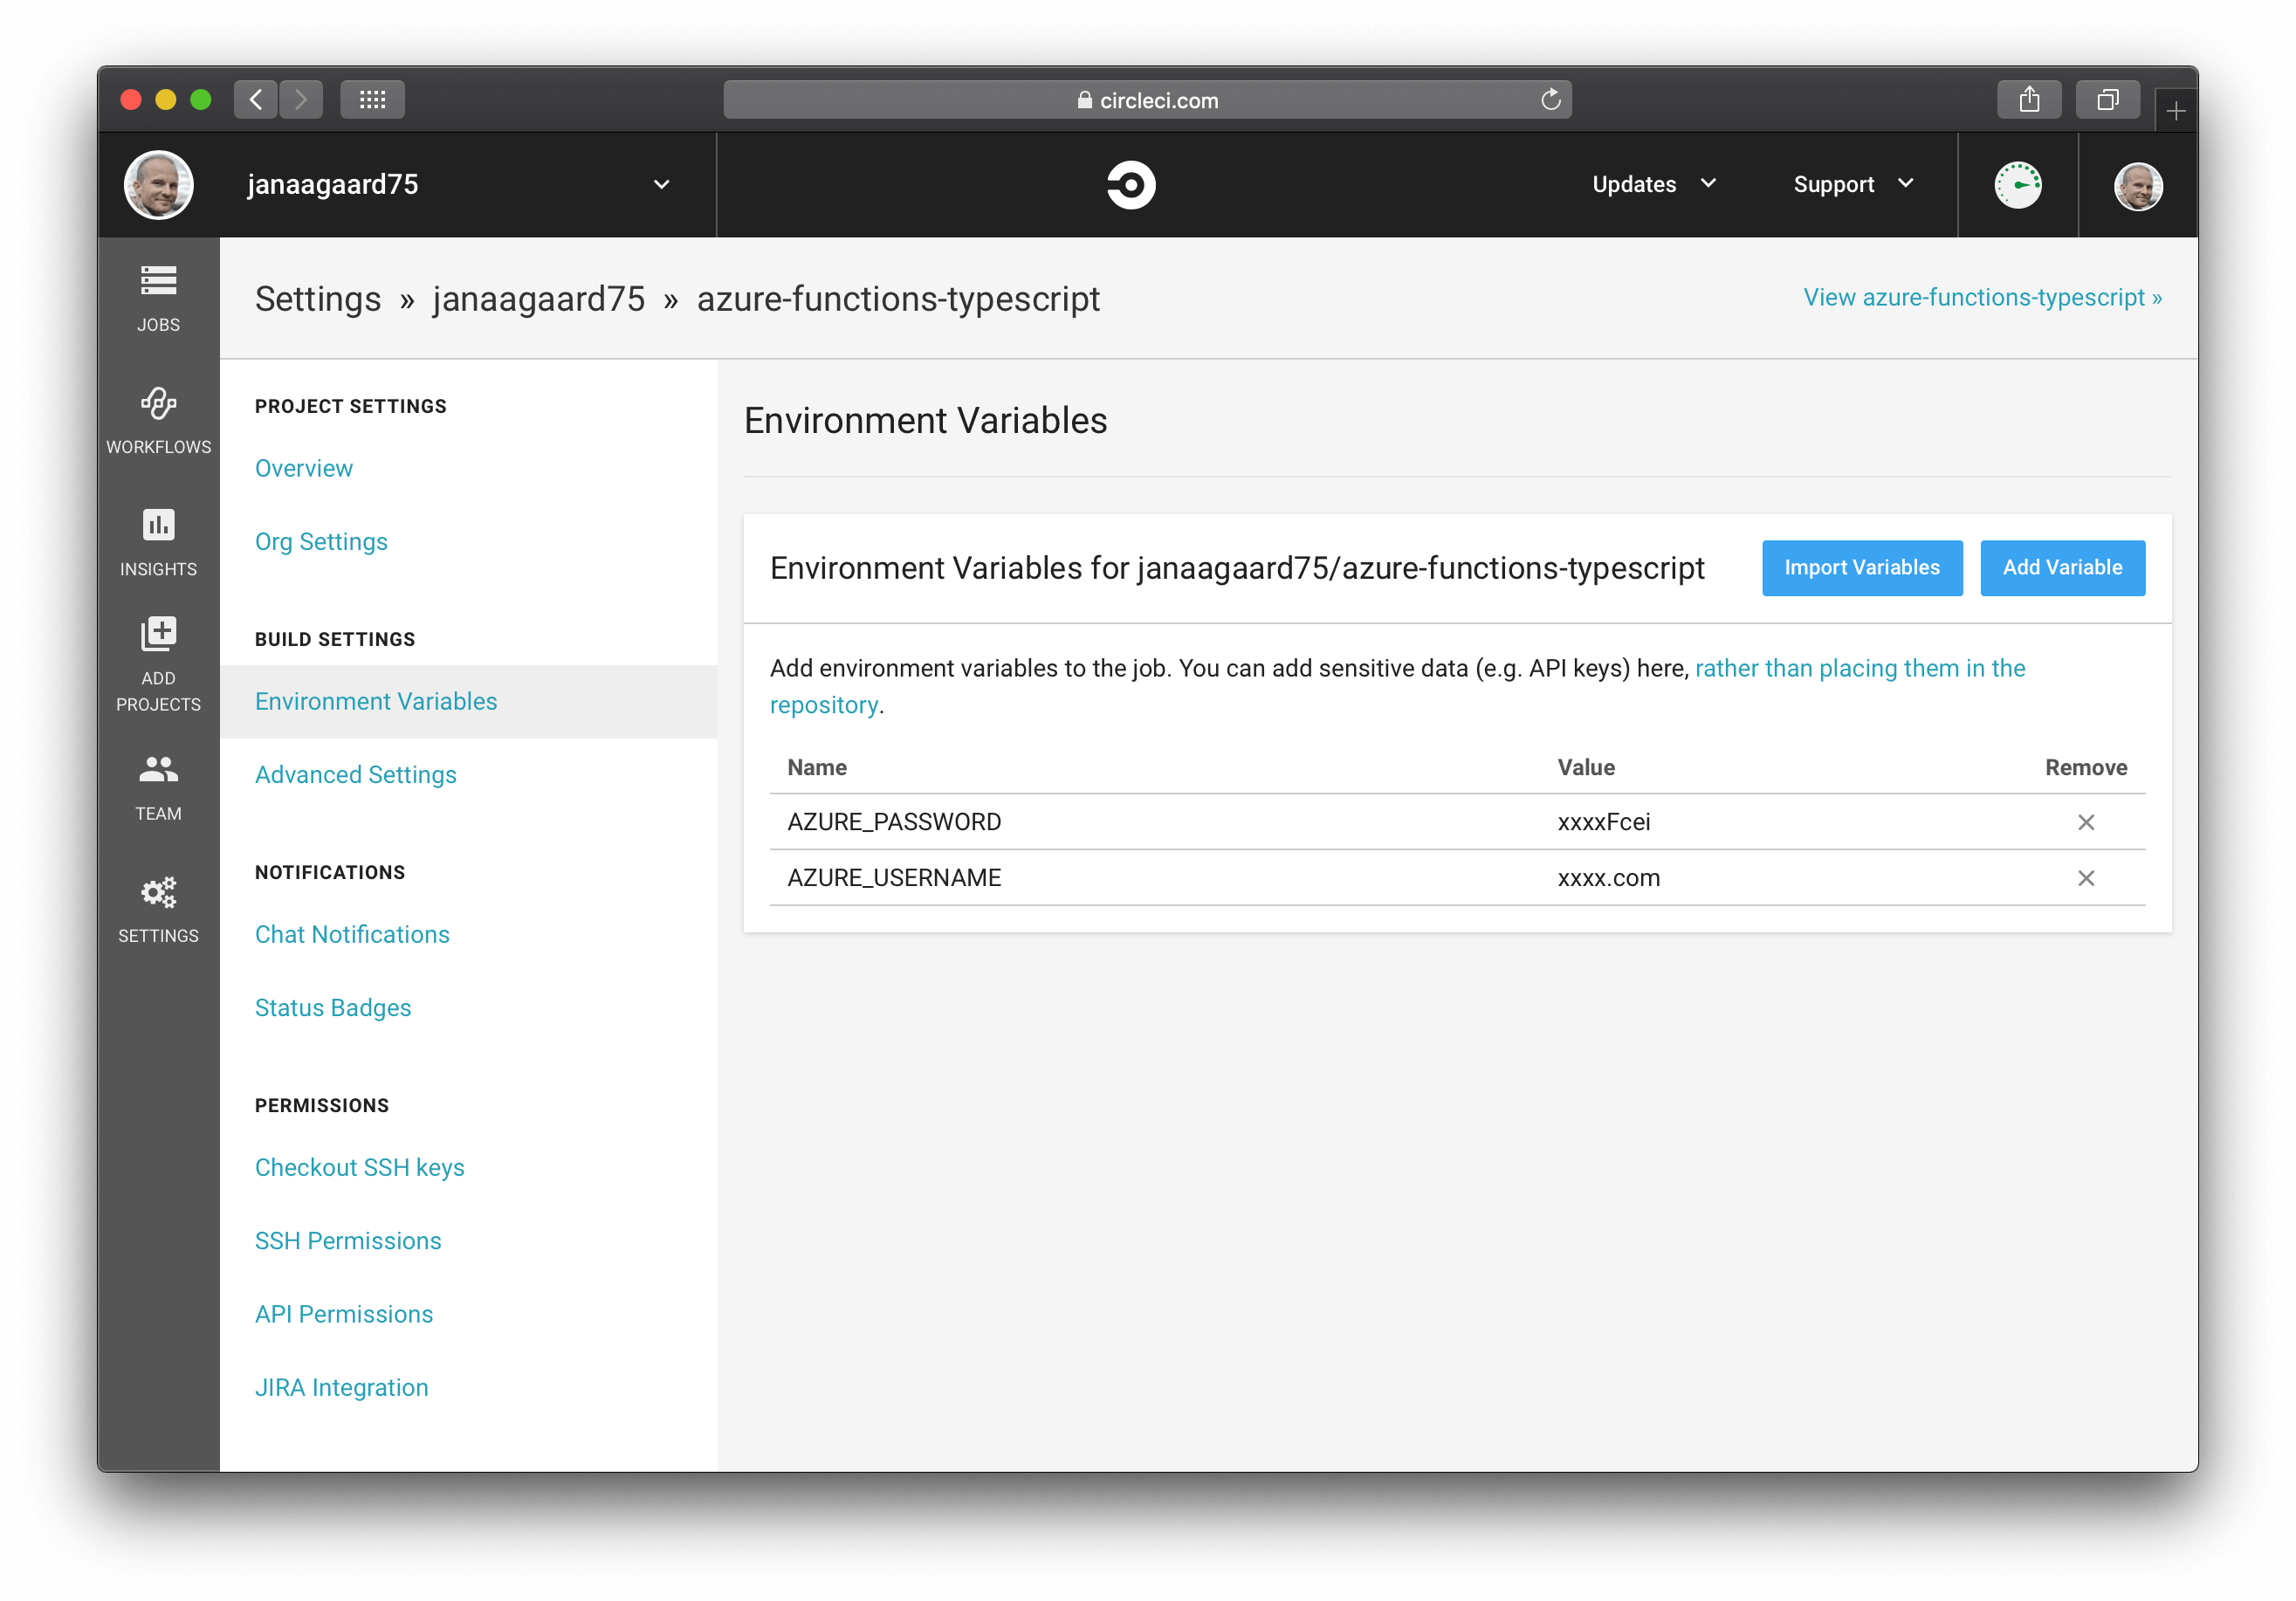
It’s quite complicated to install the Azure CLI on CircleCI, but fortunately the Azure CLI orb handles that. The orb uses the two parameters AZURE_PASSWORD and AZURE_USERNAME when signing in to Azure, so add them as environment variables in CircleCI.
A complete solution should of course also clean up after itself and delete the branch environments when a branch is delete. CircleCI does unfortunately not support executing a job when a branch is deleted, so a more complicated solution would have to built. Other CI systems like GitLab’s integrated CI/CD supports triggering jobs when branches are deleted, so hopefully CircleCI will add this feature too.
The code base after this step.
In the previous step we enabled automatic creation of branch environments. Now let’s write a test that verifies the actual endpoint on Azure works. We can break it down into these three steps:
greet function app in Azure environment associated with the current branch.Our tests are currently being executed before we deploy to Azure, but since we now want to verify the deployed code, we will add a second type of test that will run after deployment. We will call the second type of tests end-to-end tests, and for the lack of better name, we will call the other tests local tests.
| Local Tests | End-to-end Test |
|---|---|
| Fast. | Slow. |
| Run without deploying. | Must deploy before running. |
| Runs in an isolated environment. | Runs on the actual deployed code. |
Because of the slower execution time and because a failing end-to-end tests won’t stop deployment, I recommend that you write most of your tests as local tests, and only have a few end-to-end tests verifying the deployed code. The short command test runs the local tests.
TestHelper.getApiRootUrl() gets the root API url through the resource group. This could have been simplified a lot by simply computing the URL using the current branch name (https://aft-${branchName}-functions/api), but the current solution also works if uniqueString had been used for the name of the function app resource, and I thought that this snippet might be useful to someone, so I left it in.
git symbolic-ref --short HEAD.az resource --list ....aft-*-functions..azurewebsites.net/api.private static getApiRootUrl(): string {
const currentBranchName = this.runShellCommand(
"git symbolic-ref --short HEAD"
).trim();
const resourceGroupName = `azure-functions-typescript-${currentBranchName}`;
const resourcesInfo = this.runShellCommand(
`${this.azCommand} resource list --resource-group ${resourceGroupName}`
);
const resourceInfos = JSON.parse(resourcesInfo) as Array<ResourceInfo>;
const functionsResourceName = resourceInfos
.map(resourceInfo => resourceInfo.name)
.find(
resourceName => resourceName.match(/^aft-(.*)-functions$/) !== null
);
if (functionsResourceName === undefined) {
throw new Error(
`Could not a functions resources in the resource group '${resourceGroupName}'.`
);
}
return `https://${functionsResourceName}.azurewebsites.net/api`;
}